How to set up Mainflux Industrial IoT platform on Windows using WSL, Docker & Docker Compose

Introduction
This is an (experimental) way to set up Mainflux on Windows 10. Please note that the recommended distros for running Mainflux are Debian / CentOS. 😬 So, you are probably better off installing it on those distros. I tried this to see if it worked. If you still want to go ahead, here are the steps:
What is Mainflux?
According to the Mainflux docs:
“Mainflux is a modern, scalable, secure open source and patent-free IoT cloud platform written in Go. It accepts user and thing connections over various network protocols (i.e. HTTP, MQTT, WebSocket, CoAP), thus making a seamless bridge between them. It is used as the IoT middleware for building complex IoT solutions.”
The docs go deeper into the different components and offerings of the platform. Let us look at the installation steps now.
Install/use Windows Subsystem for Linux (WSL)
Ensure that the distro you are using is set to run using WSL 2. You can find a WSL distro of your choice on the Windows store. I chose Debian. Run this on PowerShell after your distro is already installed if you haven’t already.
For. e.g.
wsl --set-version Debian 2
Setting up go.
Use the latest go version while following the steps given in this tutorial
Installing Docker Desktop
This step requires Docker Desktop for Windows to run properly. You can install Docker Desktop from here.
Installing Docker on WSL
Once that is done, install the docker service on your WSL using the repository.
Run
sudo service docker start
or
sudo /etc/init.d/docker start
if the first one does not work
Troubleshooting
Do
sudo touch /etc/fstab
if the fstab file is not found
Verify your installation by running
docker run hello-world
Close this container so you don’t have any conflicts with other services vying for port 80.
Don’t use sudo for docker commands as it is a security risk.Instead, follow the steps given here.
Install docker-compose
In your WSL window, install docker-compose as per these instructions.
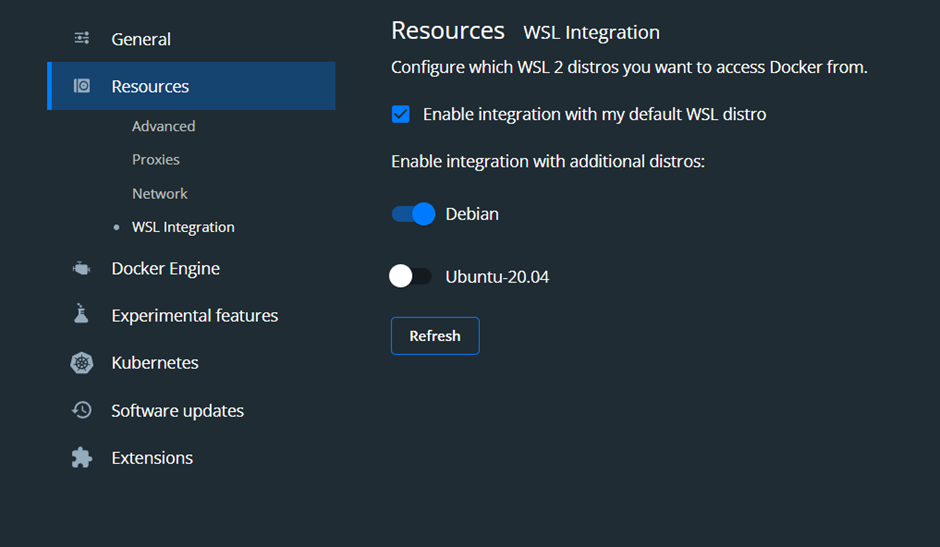
Close and reopen your Debian WSL window if docker doesn’t start. Make sure that Docker Desktop is running on windows.
Make it your default distro through PowerShell.
> wsl --set-default Debian
Also, make sure Debian(or whichever one you have chosen) is your default distro in Docker Desktop
Troubleshooting
Are you getting the following error at this point?
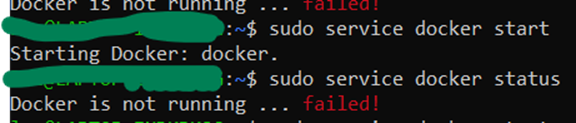
Docker is not running ... failed
Check the docker logs.
cat /var/log/docker.log

I tried the following fix (type in the WSL window)
https://github.com/microsoft/WSL/discussions/4872 in the comment by https://github.com/liudonghua123
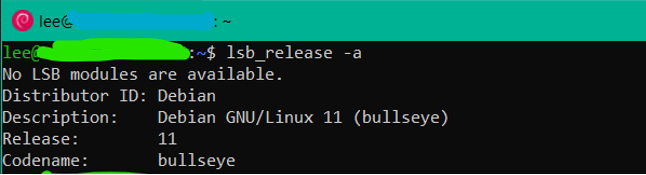
lsb_release -a
ls -al  /etc/alternatives/iptables
sudo update-alternatives --set iptables /usr/sbin/iptables-legacy
sudo update-alternatives --set ip6tables /usr/sbin/ip6tables-legacy
Followed by
sudo service docker start
Installing Mainflux
Get and install Mainflux.
git clone https://github.com/mainflux/mainflux.git
cd mainflux
I used the 0.12.1 tag as that version worked for me.
git checkout tags/0.12.1 -b 0.12.1
In the .env file at ~/mainflux/docker/.env change the version of the MF_RELEASE_TAG to 0.12.1. (or whichever tag number you are using)
# Docker image tag
MF_RELEASE_TAG=0.12.1
And type
sudo make run
Note: Run
sudo apt install make
if the make command is not found.
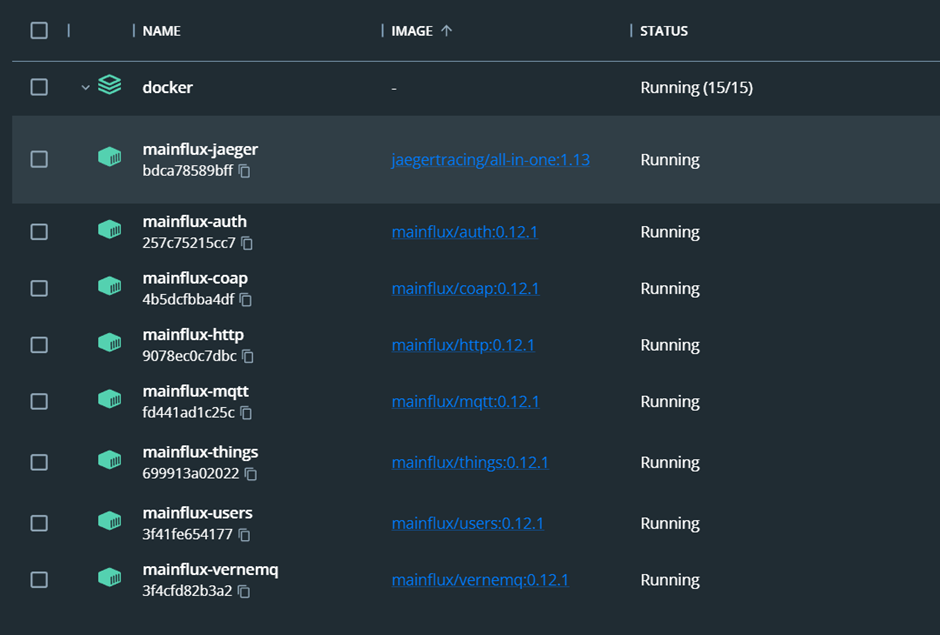
Note: Make sure all the docker containers of Mainflux are running. If a container is not starting, check if the port associated with that container is being used by another process.
Connecting to the container
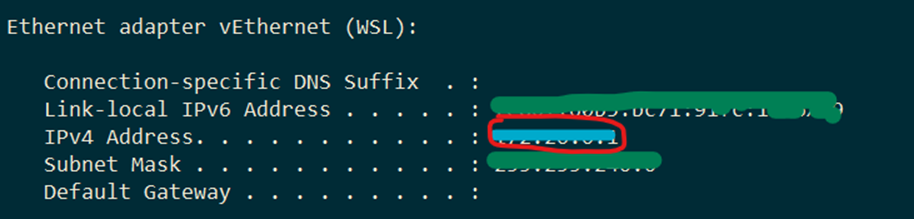
Find the IP address of your docker network.
Open a windows command prompt and run ipconfig.
Under the WSL ethernet adapter, find the Ipv4 address you need (circled).
Going to <your IP address>/users/ in the browser will give you the following message. So let us go ahead and create your user.

Get the CLI
To create users, tokens, channels and things, we can use the powerful CLI. You can get the Mainflux CLI from here:
https://github.com/mainflux/mainflux/releases
Or run the following from the project root of the files you fetched. You may do this by opening a new Debian WSL tab/window.
make cli
./build/mainflux-cli version

Steps to create things, channels and send messages
Create user
mainflux-cli users create <user_email> <user_password>
(you can also use curl. But I prefer the cli)
sudo curl -s -S -i -X POST -H "Content-Type: application/json" http://localhost/users -d '{"email": "test@testmail.com", "password":"chooseabetterpassword"}'
Create a user token
mainflux-cli users token test@testmail.com chooseabetterpassword
Make a note of the user-token
Create thing(s)
mainflux-cli things create '{"type":"device", "name":"thingOne"}' <user-token>
Create channel
mainflux-cli channels create '{"name":"myChannel"}' <user_auth_token>
Get thing (and thing key/thing auth token also in the process, to be used for sending data)
mainflux-cli things get <thing_id> <user_auth_token>
Connect channel to thing
mainflux-cli things connect <thing_id> <channel_id> <user_auth_token>
Send message over the channel (thing must be connected to channel)
The messaging format is Sensor Markup Language or SenML for short.
mainflux-cli messages send <channel_id> '[{"bn": "Dev1", "n": "temp", "v":20}, {"n":"hum","v":40}, {"bn":"Dev2", "n":"temp","v":20}, {"n":"hum","v":40}]' <thing_auth_token>
You can also use MQTT. There is more info in the Mainflux docs. https://mainflux.readthedocs.io/en/latest/
Visualising on Grafana.
To be able to view the values you sent on Grafana, you could use the influx-db writer/Grafana addon. There are other addons in the docker/addons directory like the Postgres writer, MongoDB reader/writer, OPC UA adapter, Cassandra reader/writer etc.
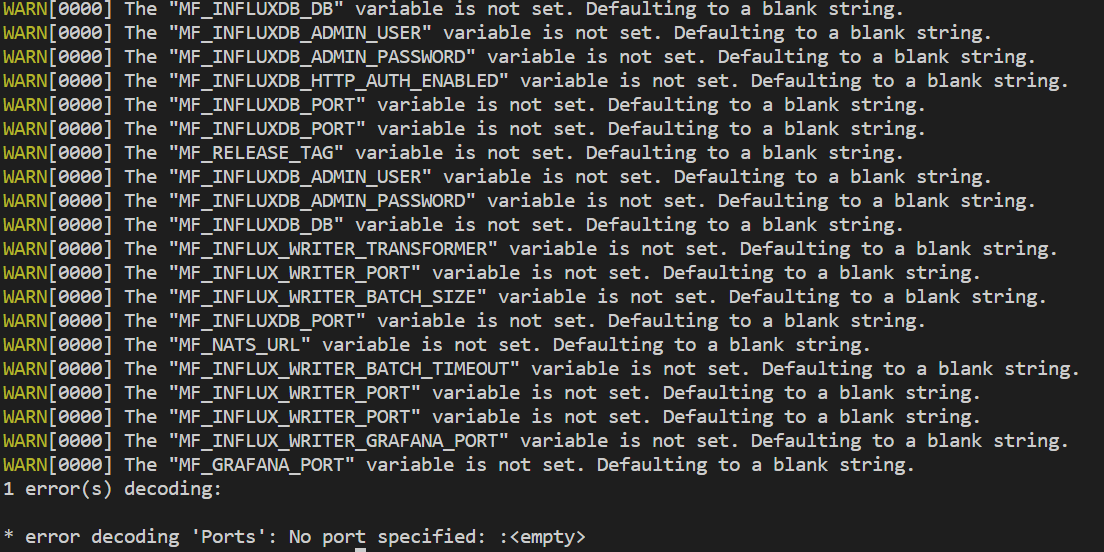
Set the environment variables as per the ones in the .env file using something like xargs or for testing, copy the .env file from the project root to the docker/addons/influxdb-writer directory. (Ugh, I know.)
If you don’t do so, you might get an error similar to the following:
Run
docker-compose -f docker/addons/influxdb-writer/docker-compose.yml up -d
The other mainflux containers must be running at this point.
For visualisation on Grafana
Go to http://localhost:3001/ and login using U/P admin/admin (change this for safety).
Datasource used will be influx DB.
Add datasource in Grafana with the following default details (you can change them as per your needs later):
URL: http://mainflux-influxdb:8086
Database: mainflux Username: mainflux Password: mainflux
- Add a panel.
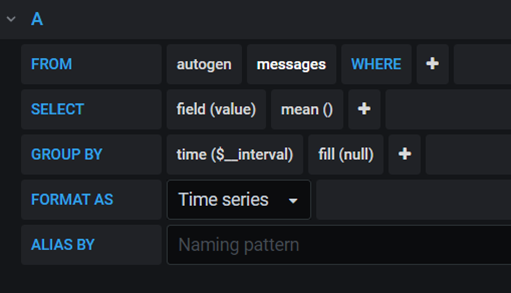

PS: This isn’t the graph for the sample values in the example commands. I captured them at an earlier time. Please don’t mind 😅
There you go. This setup should help you test out your Mainflux installation.
Share your experience in the comments.
Leave me a reaction to tell me how it went.
If you found a better way to accomplish this, let me know about that too!


